To get the most from your drum kit during a Live performance, microphone placement is a crucial element that can make or break the show. This Mic Placement Guide can be used as a starting set-up no matter how big the room is or if you are indoor or outdoor. Start here.
- The Snare Drum- Use an SM57 Dynamic Hyper-Cardioid Microphone for classic Live sound. Placed 3 ” up-just off the edge-tilted towards the Center.
- The Toms- Dynamic Hyper-Cardioid Mic-approx. 3 ” Up- Just off the edge-on 45-degree tilt towards the Center.
- Hi-Hat-Use a small Condenser Cardioid Mic-pointed straight down to the Center-high enough for the hats to open & close.
- Kick Drum-Large Diaphram Cardioid Dynamic Mic- with breather hole-place just inside the hole-Without breather hole- place the 12 ” distance and work it in and out (listen for stage bleed)
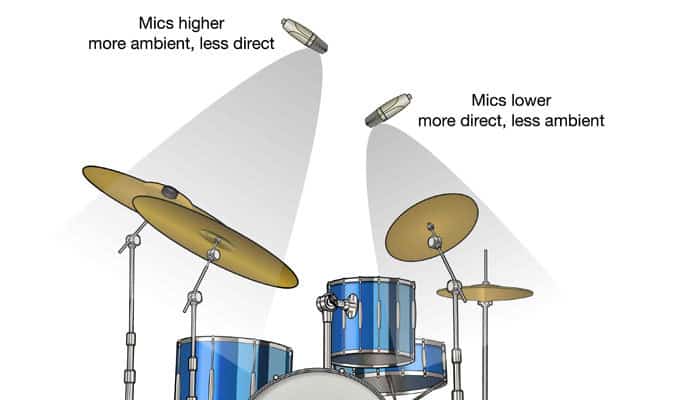
- Overheads-Condenser Cardioid Mic- 1-2 ft. or so above cymbals. Less airspace is better.
- Ride & Crash Cymbals place Use Cardioid mic pointed straight up and down over cymbal or straight up from the bottom.
These are basic one-mic setups that cover the entire kit. There are 2 mic set-ups for each drum but are more elaborate and complicated. There are problems with Phasing and microphones that are hit by the drummer along with equipment that can move around on stage.
How to Mic Drums for Live Performance
The best microphones for miking drums during Live performance have to be able to reproduce the wide frequencies of sound that drums, and cymbals and separate the rest of the noise that is happening on stage. Close miking especially in Rock music is necessary. It adds punch and flavor while keeping the personality that each component carries.
The SM 57 is the Classic Rock Mic used on Snares that are able to capture the unique qualities of the present burst and added crack that a well-tuned Snare can deliver.

Hyper-Cardioid patterns along with the Dynamic mic’s ability to handle high SPLs are good characteristics for miking a Snare. All mics record audio but do it differently. This helps with trying to record one instrument against another.
Cardioid polar patterns can be used on Condensers, Dynamic, and Ribbon Microphones. They are more sensitive from the front and least sensitive from the rear. They will pick up and record mostly from the front while rejecting sound from the sides of the rear.
This is valuable in recording and playing Live as it will accentuate or focus on what you want to accentuate and minimize the rest.
This helps immensely with Live playing because monitor speakers are used by the musicians. The mics will help keep feedback down because of the availability of Polar Patterns on microphones. Both Super and Hyper-Cardioid are similar to characteristics in polar patterns. They both offer a tighter pickup and greater ambient rejection with Hyper-Cardioid even narrowing the focus further. This all results in more control. Especially in a Live situation where there are more variables.
Small Diaphragm Cardioid Condenser mics have an upper midrange that focuses on the treble used for Overhead Cymbal and Hi-Hat work has to be clear and pristine. One of the hardest jobs they have is to record cymbals. Condenser mics are more accurate than dynamic mics. Overhead Microphones like the Rode M5 can be used on miking other instruments too like violins and acoustic guitars. Anywhere that clarity is demanded Condenser microphones will do the job.
Most Close Drum miking is done by Dynamic Cardioid Mics. Anywhere that the volume levels can be applied Dynamic mics will be better used and on the drum kit this is especially true. Higher SPL or Sound Pressure Level is an important feature in Dynamic microphones. The only problem with this is that you leave a little clarity and high frequencies that you get with Condenser mics behind.
A feature called DB Padding which normally happens in Condenser mics will raise or lower the input signal to the mic. This is something that you will see miking a loud source like cymbals. Sensitive Condenser mics will sometimes distort, using this feature you can knock the volume down and still use the microphone for optimum performance.
Before you can talk placement of mics and the type of mic to use, most sound engineers agree that more importantly is the drum tuning and the player. The drums need to sound their best and have to be played to get the best sound.
If the drums aren’t played right then the player will be whacking the mics and knocking them out of position. If they are out of tune, the sound man won’t hear the proper EQ and mix he needs to mix the instruments.
The best Tom mics including the Floor Tom need a Dynamic Cardioid Microphone at close proximity. The clip-on Mics like Sennheiser e 604 can work the Snare. They are Dynamic and Cardioid that can clip to the side of the Tom or Snare for easy set-up. The clips are out of the way and out of sight.
These mics come in sets of 3 and have a quick response, easy-to-find sweet spots, and a high SPL of handling 160 dB and are made of fiberglass and made for the loud sources but also have the “fine” quality to use on wind instruments.
Ambient Sound Recording
Overhead Mics
The Best microphones needed to mic your drums in a Live setting are not the studio-quality Condenses that Professionals need. You can get quality sound in a Live setup with decent Dynamic microphones like the SM57 & 58 and the Shure Beta58 that will handle the big sound levels that occur on stage. They will also handle most of your workload. They are less prone to feedback and they offer a good mid-range frequency. They are engineered with pre EQ frequency which makes them built for the job.
The Cardioid Condenser mics that an inexpensive like the Pencil style condenser will produce the high-end frequencies that are lost by using the Dynamic mics. Use them on the cymbals and Hi-Hat where those frequencies matter.
But I would recommend the Drum Mic Kits that include everything you need to get your kit miked on stage with fairly good quality. Kick Drum, Snare, Toms, Hi-Hat, and Cymbals are all there and ready to go. The usual price is 100 dollars per mic. A setup of 3 mics that would mic your Bass drum, Snare, and Tom would be approximately $350.00 for a quality set.
This set-up uses an Overhead Drum Miking Technique that includes the 2 overhead Pencil Condenser mics and a quality large Diaphragm Dynamic Kick Drum mic. The kit also comes with a pre-mixer that gets pretty good reviews from customers. The price is around $300.00. This could be a steal. The Sabian Sound Kit is a three-piece mic kit that comes with its own compact mixer, something that other manufacturers don’t offer.

This three-channel personal drum mixer has a dedicated channel for capturing the kick drum via the included SK1 mic. The other two channels are for capturing everything else via two SOH2 overhead mics.
The mixer also lets you monitor your sound via headphones through its 3.5mm and 1/4″ jack outputs. This one was impressive for one the price and what’s included. This all gives the drummer even more control over the Live mix.
The quality is good with these kits and they include all the accessories you will need to attach your mics to your drums.
These clips will enable you to “close mic” a drum in your kit without stands and hardware that eventually may move around during a live gig.
They also come in a case, so they’re easy to transport and pack up at gigs. They should be cheaper than buying one mic at a time.
In our next post, we will be looking at Guitar Microphone Placement in the studio.
Simple Live Drum Mic Setup
JimGalloway Autor/Editor

MikingDesign.com

