Musicians always thought that the best place to mic a Stand-Up Bass was at or near the f-holes on the front of the instrument which was not necessarily true. A lot of the desired sound of the lower frequencies of a Bass has to do with many different things. How to Mic an Upright Bass?
Live:
Use a Condenser mic 18″ away
Aimed just below Bridge or
6 “off Strings aimed between the Bridge & Fingerboard
Recording:
Use a Large Diaphragm Mic
6″ off the front of strings
Aimed halfway between the bridge & bottom end of fingerboard or
12-18 ” away aimed at Bridge
2-3 feet away aimed at f-hole
There are a few Microphone techniques that can take advantage of the smooth low end of the Stand-Up Bass while still adding some higher-end for full frequency response.
How to Mic a Stand-Up Bass for Live Performance
The Acoustic Upright Bass is one of the hardest instruments to mic for a number of reasons. The player can make a big difference in the position of the microphone. Mic Placement is more important than other instruments because of the size and frequencies of the instrument.
Usually, the Stand-Up Bass is played in a Live setting like a Jazz trio which is placed very close to other instruments on stage. This means there will be a lot of leakage from other musicians that will be picked up by being in the same proximity as the Upright Bass and mics that record it.
This is why Mic position and placement is the most important factor when miking an acoustic Bass. Just like an Acoustic Guitar place of the mic too close to the f-hole or even too close at all will muddy up the sound like miking too close to the soundhole on an acoustic guitar. Too far away from the Stand-Up Bass will pick up other undesirable sounds of people on stage.
To mic the Bass properly we need to find a sweet spot that is somewhere in between. More than any other instrument the acoustic Bass microphone needs some space to be able to capture the wide frequencies that the instrument can produce.
The lowest note is the E1, which is equivalent to 41Hz. To capture the low notes you need to choose a microphone that is capable of handling low frequencies. The overtones and the fine details of the double bass also require the microphone to handle high frequencies and have a high level of accuracy as well.
Technique #1
- Start with the 1 mic about 18 ” away from the Bass
- Aimed just below the bridge
- Keep this position and make small incremental changes. This will give you some definition along with the sound coming off the instrument.
- Start to move the mic in and out widening and closing the space between the two that will give you the best blend of definition and body.
- The Mic should be a Condenser, especially on a stringed instrument that’s acoustic in nature. If you have a Ribbon mic in your arsenal than try each one. They are used on delicate wide frequencies like the Stand-Up Bass.
- Remember Microphone Place is the most important factor more than the microphone.
Technique #2
- Use a condenser microphone
- Directly in front of the Bass and about six inches from the strings
- Aim the capsule halfway between the bridge and the bottom end of the fingerboard.
- Adjust the mic placement moving closer to the bridge. This is where a large majority of sound engineers prefer to mic and consider it the sweet spot.
- The AKG mic works well here and does a great job of picking up the rich tone and nuances from that sweet spot on the bass. This all works nicely with the P.A. system and/or an accurate amp such as the Acoustic Image line of amps.
How to Mic an Upright Bass for Recording
The upright bass is capable of deep, rich, warm sounds as well as articulated, clear, and melodic tones. As we said earlier these characteristics depend on the instrument, the strings, the player, and the musical style.
With Rock styles and Pop styles, the Bass is involved in a different context and job that it’s doing rather than in Jazz where it’s more a stand-alone instrument focused in a different way. In Rockabilly or Bluegrass, the Stand-Up Bass is an accompaniment to the rest of the group and a lot easier to record.
For Home Recording use an Omni-Directional mic that can be backed up around a foot or so. A decent pencil condenser mic with an omnidirectional capsule can offer great reproduction with excellent low-frequency response, and it has no bass proximity effect, so those subtle higher frequencies aren’t masked by the over-hyped low-end.
The good things about Omni-Directional microphones are that they are different than how Directional mics will exhibit proximity and affects the buildup of additional low end as a mic moves closer to the sound source. Since there is usually an excess of the low end associated with the Stand-Up acoustic bass, the proximity effect is not a good event in the recording so if you have a good room your recording in, it’s something to consider.
On the flip side, the Omni mic captures sound from all directions, so room reflections can potentially ruin the sound of the instrument itself or can be beneficial. If the room isn’t up to par then a Cardioid microphone will do. Make sure the main lobe of a cardioid mic is in a direction, and that’s largely the sound it will feature.
When the room sounds ok but not great then use a figure 8 polar pattern mic. You can adjust ambiance using mic placement. As you move the mic closer to the Upright Bass, the proportion of room sounds, reflected from behind the mic only, reduces. Move it away and you can add some space and room. It’s a perfect way of dialing in an acoustic instrument like the Upright Bass.
Technique #1
- As a starting point, begin with a large Diaprapm Cardioid mic between 12 and 18 inches away from and pointing directly at the bridge.
- Imagine a straight line coming up the bridge into the center of the mic, which is aligned with the imaginary line, the on-axis.
- There’s no secret formula to this alignment, only that it’s a known place to start.
- Adjust the Mic in and out to balance the room sounds
- Aim it toward the fingerboard for more definition and clarity, or turn it away for less. Move side-to-side to balance individual string volumes or to fight boomy resonance.
- Avoid f-holes
Technique #2
- Using a Large Diaprahm Mic
- Start at 1.5 to 2 feet away from the Bass facing the Strings-for an articulate-snappier sound
- Move the mic back further and aimed at the f-hole to create some airy space in the sound with less slapping string sound
- For more of a softer, round fuller sound move the mic back off the f-hole with a good Condenser mic
- The best Bass sound for Recording will be around 2-3 feet away off the f-hole adding depth and fullness with a good working Condenser Mic.
Bass Mic
Close miking an instrument is often considered less than the best way and to be a compromise to the instrument’s true tonal acoustic sound. An instrument’s sound is usually designed to be experienced at a distance adding space and tonal qualities that only can come from the entire body of the instrument. This way, all the different elements of the sound are naturally blended. Still mounting a microphone directly on the instrument is the most practical solution.
Finding and placing the microphone in the instrument’s sweet spot – or your preferred location can be a challenge especially that is the size of an Upright Bass. Keeping it there can be even more challenging, especially if the instrument is moved. For this reason, close-miking requires a dependable mounting solution. For recording in a live setting and miking up to the PA with the band this guy rules.
The key to these little guys is the Omnidirectional type of microphones that has the great advantage of picking up sound evenly from all directions although some “omnidirectional” microphones are slightly directional at the highest frequencies.
Using an omnidirectional microphone is appropriate when you want to pick up the full sound of the instrument and you can maneuver it using a gooseneck a short distance away from the instrument without the proximity effect that Close miking causes.
This type of clip-on mic is made to be used for live playing with the band but the advantage is for the recording Live Setting when the playing on a full stage and up close to the drummer when it’s almost impossible to avoid bleeding from other band members.
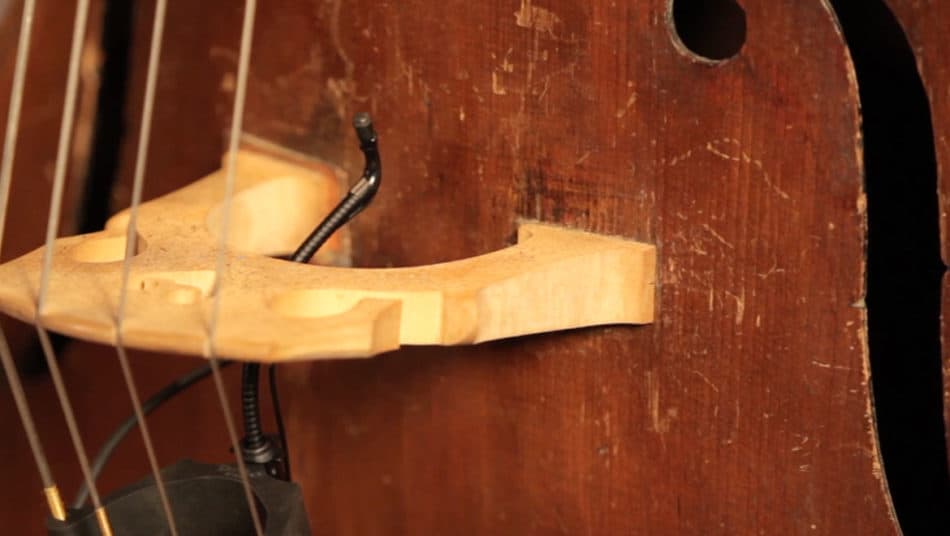
Microphones like the DPA 4061-BM | Standard Sensitivity Mini Omnidirectional Miniature Microphone Black The DPA 4061BM Omnidirectional Miniature Low-Sensitivity Microphone Black is a miniature omnidirectional lavalier microphone designed for use in performance and theatrical applications.
Use the DPA BC4099 Bass Clip which is sturdy and made to stay in place in almost any position. It fits over or under the strings and can be adjusted to reach across two to four or even between two strings due to its flexible design. The clip works together with a number of the company’s goosenecks allowing you to not only place the microphones according to your taste but also take the application and the surrounding noise into consideration.
The miniature lavalier features a condenser element with a frequency and sensitivity response that will accurately reproduce audio signals from the human voice and instruments. They are small and lightweight but durable and can hold up for the working musician. They are the perfect application for drums, horns, and in our case the Stand-Up acoustic Bass.
For Live playing this type of Close Miking makes complete sense and in my opinion is a solid way to go. They have their advantages. The price is a little steep but looks at what this mic can do and the ease of operation. Not for recording but for everything else. The benefit of owning one of these outweighs any cost.
Using 2 Mics To Record Stand-Up Bass
Using two microphones can be a good way to balance the instrument and provide additional control in mixing. Use one mic low, near the bridge as before, with another small-diaphragm condenser higher up the neck where the strings are plucked. The two combined can be really beautiful: simply fold in the high mic to taste.
- If you use it to remember the 3:1 rule to prevent phasing.
- The distance between the two microphones should be at least 3 times the distance from the sound source.
- For example, if your lower mic is 8 inches away from the bass, then the upper microphone needs to be at least 24 inches above it.
- Use 2 pencil-type Condenser Microphones
JimGalloway Author/Editor

