
Ever since the Home Recording Studio took shape a decade or more ago especially with the Digital Trackers new ideas became even more important with quality came professionalism and brought the game up some. Try a few unique stereo recording techniques that will give simple songs a feel that is more produced without adding more layers and expense to it. What are Some Stereo Miking Techniques?
Unique Stereo Recording Mic techniques for Home Recording involve the use of two mics, their configuration, polar patterns & positioning in combining with each other to create a Unique Stereo image. Some of them are:
- X/Y Stereo
- Blumlein Stereo
- Binaural Stereo
- Mid-Side Stereo
- Decca Tree Stereo
These types of simple unique mic placements can make the music stand out without volume or effects and bring to the table something new and different by simply using recording mics in various unique positions.
Recording a Song at Home
As a Songwriter myself, recording music entails a song idea put to pen and paper. Then to record it to bring it to life. To get a project together, work on it until an idea that was in your head takes fruition, is really magical. What’s even better is to record it well, Strong enough for it to sound good but more so, make it sound different and Unique.
To get it to sound professional, normally you would have to get it to a studio and pay for engineers and producers to do what they are paid well to do. If you can get a piece of that result without selling your house then you are successful.
This blog is about making your music sound the very best it can sound. Mic placement and how you use them is the secret to successful recording and a chance for someone to get that song heard which is the goal of every songwriter. There are great recording instruments and gear out there to get you going along with specialist advice and techniques that can enhance what you are chasing after. Still, it’s tough to learn.
Live drums have always been hard to mic. The drum machines never filled the void that can only be filled by real live drumming. Now it’s possible. Even electronic drums today sound pretty good but live kits with excellent drum techniques work so much better.
Recording magazines, books, DVDs, and websites offer helpful information. Don’t compromise, use real audio and real equipment. Start with a voice and an acoustic guitar and make a perfect recording with 2 microphones to gain the knowledge you’ll need. Learn mic placements and positions the basic techniques.
A live recording on the guitar with a voice on top. In most situations, this might be enough to get your song across. You need to have the basics down completely and then add something unique that will stand out. You can achieve this by some Unique Mic Placements from this article.
It’s a great place to start to learn all about miking and how to replicate the sound you’re looking for. It’s always, at least for me difficult to try and be creative with the songwriting side me while learning the basic technical side that will give you the opportunity to use the instrument and equipment the proper way you have to.
If you know the basics and where to start then it’s a whole lot easier. Try and stay productive but learn to say when. It’s very hard to know settle on one track and called it a day. Especially when you are making a decision on what’s a wrap and what’s not good enough.
Don’t kill the recording with effects and colors that won’t ever matter because at the end of the day your song needs to be broken down to bare bones and should be just as good as with a full band. If someone likes it they’ll take the song based on its own merit. I have learned this the hard way. Great songs are recorded in a few takes.
Doing it the right way right from the start is the best way! That’s Microphone Placement. The building block for Artistic Development. The solid structure that holds it all together. Strong enough so the song comes across.
Microphone Techniques
XY Mic Placement
Here there are two directional microphones at the same place and typically placed at 90° or more to each other. A stereo effect is achieved through differences in sound pressure levels between two microphones. Due to the lack of differences in time-of-arrival and phase ambiguities, the sonic characteristic of X-Y recordings is generally less “spacey” and has less depth compared to recordings employing an AB mic setup.
In X/Y or coincident stereo miking these types of mic are placed right next to each other. X/Y Miking is a very common way of miking in studios and on portable microphone recorders. It will narrow the sonics but the sound will offer depth.
The placement is easy and creates a great sound. The X/Y technique can offer a stereo image that can be manipulated by moving the mics closer or farther in distance. You can explore many variations on the standard XY stereo mic technique by making the angle of the mics greater than 90 degrees. This increases the stereo width and decreases the strength of the center.
To set up the mics just position two cardioid mics (usually small-diaphragm condensers) at right angles, aligning the front of the capsules, and you’re good to go. This method is ideal for close-mic applications and provides a clear but not terribly wide stereo image with minimal phase issues. You can use I stereo mic in one capsule like the awesome Rodes mic that is a beautiful specimen
Rode NT4 X/Y Stereo Condenser Microphone Offers a perfect X/Y stereo array without the need for matched pair microphones, complex stereo bars, and equipment
Ideal for drum overheads, percussion, choir vocals, environmental recording, and sound design in a studio or in the field
Includes custom twin head windshield WS4, RC4 case, and 5-pin Minijack and XLR stereo cables
Blumlein Stereo
When the microphones are bidirectional and placed facing +-45° with respect to the sound source, the X-Y-setup is called a Blumlein Pair. The sonic image produced by this configuration is considered by many authorities to create a realistic, almost holographic soundstage.
A further refinement of the Blumlein Pair was developed by EMI in 1958, who called it “Stereosonic”. They added a little in-phase crosstalk above 700 Hz to better align the mid and treble phantom sources with the bass tones. The Blumlein Stereo image is one of the most unique ways to capture an articulate stereophonic image by combining a pair of bi-directional microphones.
This arrangement consists of a matched pair of figure 8 polar patter configuration microphones. They position 90 degrees in relation to each other. As a coincident pair. The result is a 4 lobed polar pattern. The area is oriented so that the line bisecting the angle the 2 mics points to the center of the sound source.
The Polar patterns of the pair combined with their positioning delivers a very high degree of separation in the source material as well as offering a great capacity of capturing a natural reverence of the recording environment. These mics can mix panned left and right and offered a very detailed sound.
A Ribbon Microphone is used for this technique and employed to record the piano and other instruments that demand higher quality recording. These FAT HEAD Ribbon Microphones from Cascade Microphones are sold as a stereo-matched pair and are versatile enough to handle almost any vocal or instrument recording, and live sound application.
The FAT HEAD features a hand-tuned ribbon element that incorporates the legendary symmetrical ribbon design in order to achieve a true symmetrical figure 8 polar pattern. Its frequency and sensitivity response are engineered to deliver pristine audio results, and the element’s design is very useful when executing a mid-side or Blumlein recording.
Decca Tree Mic Technique
The Decca Tree Microphone Technique uses is most commonly used for orchestral recording. It was originally developed as a sort of stereo A–B recording method adding a center fill. The technique was developed in the early 1950s and first commercially used in 1954 by Arthur Haddy, Roy Wallace, and later refined by engineer Kenneth Ernest Wilkinson and his team at Decca Records, to provide a strong stereo image. The technique commonly uses omnidirectional mics.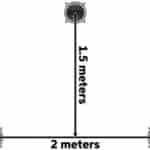
It’s one of the most popular and unique ways to provide special ambiance in orchestral and symphonic productions. The Decca Tree itself normally of an arrangement of three omnidirectional microphones the Neumann M 50 tube condenser is a perennial favorite — suspended around 10′ over the conductor’s head.
The rear 2 mics are approximately about 6.5 Ft apart from each other, and the center mic one and a half meters just under 5′ in front of the others in a triangle formation. The effect is a natural and highly musical stereo recording. These days they are used to mic drum kits and small choirs for a full type ensemble sound.
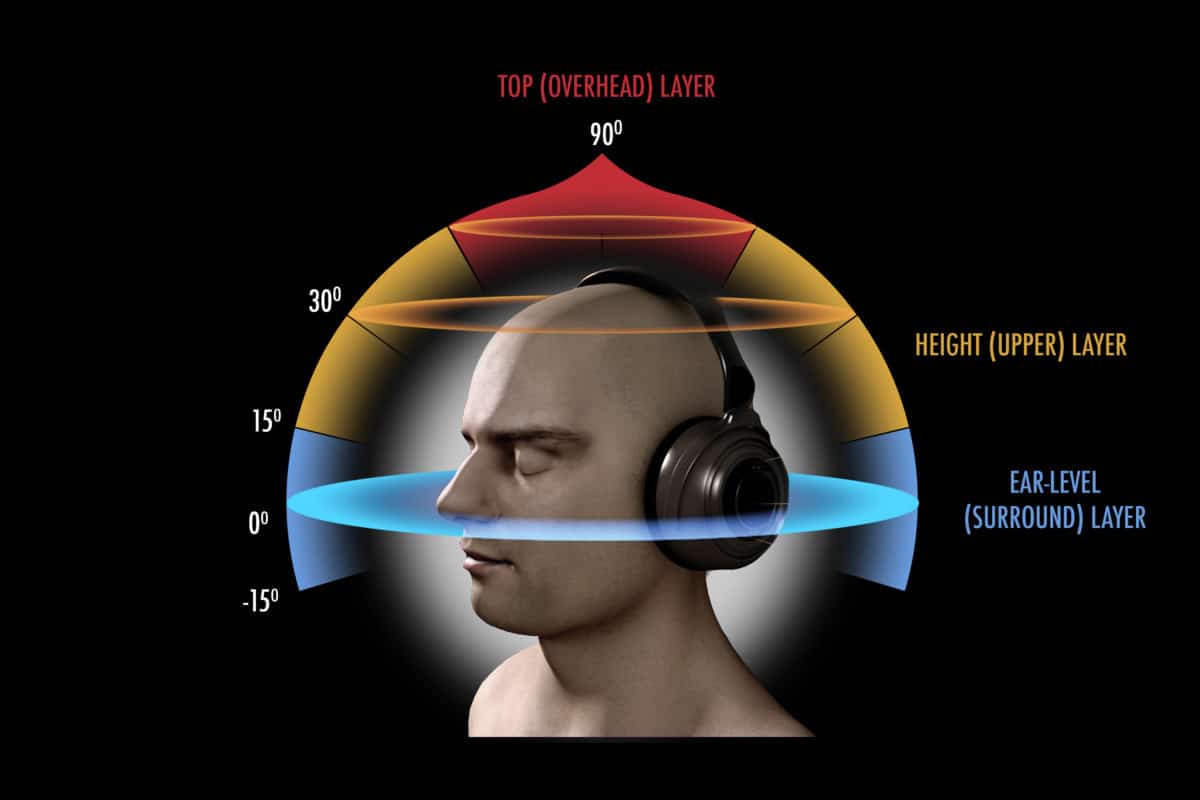
Binaural Audio Recording
The binaural audio setup is meant to reflect the way we receive sound in real life, creating a vivid soundscape experience as if you were there. To some extent, you already have access to binaural audio. It’s simply a fancy way of describing how human beings normally hear sounds — ‘bi’ meaning two, and ‘aural’ referring to your ears. With Binaural Sound sound waves can be captured above below and behind the person that is listening.
Binaural sound is not to be confused with conventional stereo sound. Stereo audio allows for localization to the left and right upon playback. With binaural, a listener can localize sound sources in front of them, behind them, above and below. Stereo does not factor in the natural ear spacing or “head shadow” of the head and ears.
The Microphones are placed on a mannequins’ head or styrofoam and the mics would record what a person will here in the same positions that a human’s head will here be giving the listener a precise and unique perception that is simulated but real.
You need a pair of small and omnidirectional microphones, such as the wireless 4560 CORE Binaural Headset Microphone is, in its essence, a pair of 4060 CORE Miniature Omnidirectional Microphones that are mounted on two ear hooks (as known from the 4266 Flex type of headset).
The microphones are a stereo pair; two handpicked 4060s, selected on sensitivity within +/-1.5 dB. The actual headset is designed to fit comfortably and easily. It adjusts to fit any ear size and head shape while at the same time it mounts securely and is hardly visible.
Foam windscreens are supplied with microphones to secure the position in the ears and offer a little damping of the wind noise. The downside is the sound doesn’t translate to speakers very well.
Mid-Side Stereo
This type of recording technique is very useful in smaller types of studios, especially what most of you are dealing with at home. What odd compared to the rest of the stereo concepts that we have been examining is that you don’t need two microphones that are the same or paired the same.
So even with two different size condensers, one small and one big then you can perform this technique. The method just pairs 2 different mics to create one stereo image. The stereo image works like this:
- It contains 1 mid microphone which is a cardioid mic that is recorded to 1 channel in your DAW
- You have a side mic with a figure 8 polar pattern that records to # 2 channel in your DAW
This technique is good for smaller home studio spaces and rooms that the sides are close and boomy so that you can adjust the sounds as different sources that are independent of the other sides. You may want to focus on some maybe harsher or cleaners sounds while taking some off the other side.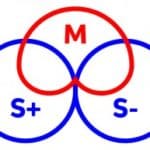
When you don’t want to worry about phase issues then you should definitely check out the Mid-Side M-S stereo technique. All you need to set up this totally phase-coherent stereo technique is a cardioid mic the mid or M mic, a figure-8 mic on the side or S mic, and an M-S decoder of some kind or some clever summing in your DAW.
It’s a good idea for both microphones to sound identical, or you may have trouble matching levels, so many engineers use the same multi-pattern condensers for both microphones, but that isn’t strictly necessary.
Now, when you lower or raise the volume of the combined side mics, you will be adjusting the stereo width. Best of all, since the stereo side channels are completely phase-coherent both derived from the same mono source, they’ll cancel each other out when summed to mono, leaving your final stereo mix completely phase-coherent.
Starting with the basics every time you start your recording equipment can give you an edge because every inch to one side or to the other can make a huge difference in the way the mic placement is handled in the space your recording in. Pick one of these techniques and try what they are able to accomplish in the situation your in.
Read the description and give one of these a try at the start. These patterns or positions are the bare-bones essentials for setting up a recording, right from the beginning. It might just give you an edge above standard placement techniques that more than likely are what you are using today.
Think differently and Unique and always trust what you write and what you hear because it could be the one thing that sets you apart from everyone else. Try a Mic Technique that is unique but make the recording Strong and Clear.
JimGalloway Author/Editor

MikingDesign.com
