

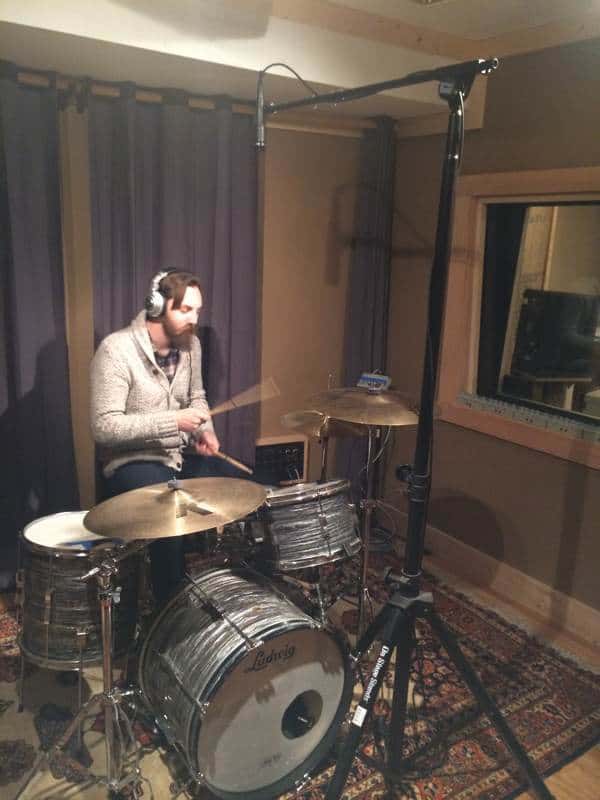
If you’re looking for an improvement in recording Drums for your own Home Recording studio, there are lots of set-ups and techniques that studio engineers will give you. But the direct answer to getting the best sound out of your kit at home is practicing mic placement and positioning to learn. What are the best mic placements when recording Drums at home?
- 1-Snare mic-3″ off the head & 3″ deep-pointing center.
- 2-Tom mics-3″ up at a 45-degree angle aimed center
- 1-Hi-Hat-mic-aimed down at the edge of the cymbals
- 1-Kick Drum mic-Slide capsule-through breather hole 6 ” from the batter head then back it out an inch at a time
- 1-Overhead Mics-1-3 ft. above cymbals
Professional Studios have space or most do anyway. You probably don’t. They have the equipment. You most likely don’t. They don’t have maximum time and just maybe you do. So use mic placement to keep on the same playing field as the pros.
Recording Drums
Studios make money by renting space and Engineers by the hour. So start with the small things that you can do, like taking the time to experiment. One of the most critical ways to improve your Home Recordings is Microphone Placement.
You don’t need a ton of money to buy microphones, you need to know how to use the right microphones for the right job. If your mics are decent and they are in the right position and applied to the right instrument that is engineered for the right frequencies. You can get some pretty remarkable recordings. Songwriters should not be looking for the perfection of a Professional Recording Studio.
Songwriters need to showcase their music so a great recorded song is what you are aiming for. Don’t get hung up on perfection because you’ll be turning knobs forever. Your Studio is a tool. Your Songwriting is your passion. Your eye on the prize.
Hopefully, you read my previous lessons and the room you are recording in is acoustically right for your drums to sound somewhat smooth and natural.
You can always improve on the sound by moving your Bass, cymbals, or Snare drums in increments around the room you are recording in for better sound just like microphones, you can change the EQ without touching the Console. This is the starting point for an appropriate sound
Moving furniture or equipment can make a world of difference in capitalizing on any resonance that is in the room. This is the first type of control you may not be limited to, so take advantage of it.
It’s easy to jump in and worry about it later but if you put a little time into it before you start, it may pay off. Big problems down the road just can’t be fixed in a mix.
The best thing to do is make a few changes to the room and your equipment before you turn the recorder on. Then position your Mics and experiment with the placement to get what you need.
With some versatility with the limited sounds, you have with your kit adding some extra will help. Some extra percussion equipment like tambourines or wood blocks, any variety that can add some flavor to the recording.
Variety also includes different snares, cymbals, and drums or hardware that can be swapped out with your kit to change up the sound. If you can’t afford extra drums and cymbals then change the sound through drum heads or snare adjustments and tunings that can add a little versatility to the sound you are recording.
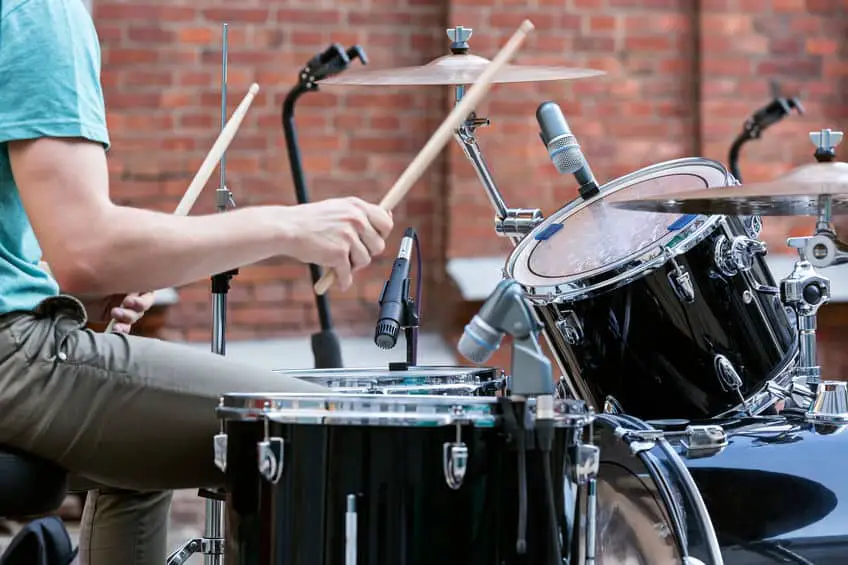
Next, you will need some capable mics that will pick up the versatility that your drums produce and transfer those sounds to a recording. Drum mics don’t have to be expensive and according to the room acoustics and the type of recording, you may not need as many as you think.
All the specific things like room size and acoustics, drum variety and versatility, and microphone quality are dependent on microphone placement. If the mics are not positioned right, you won’t get the sound you need to get. Leaving the acoustic sound of the drums to your pre-amps and mixers is something of another topic that we will talk about in another section. But first, let’s talk about the use of drum microphones for the types of drums they record.
Best Mics to Record Drums
With the popularity of Home Recording Studios, miking drum kits became a necessity, and companies like Shure and Audix came up with sets of specialized drum microphones for this reason. Dedicated mics that are specifically engineered with that particular drum frequency in mind.
This makes it a lot easier for us musicians to work with. Each piece of your drum kit will be miked by a particular ideal microphone that works well in those known frequencies.
This can be a very complicated matter. Microphone manufacturers knew this and have tried to come up with some ways to simplify the procedure.
One way was to sell an assortment of mics together for each component of a drum kit. Such as including mics that would capture bigger drum low frequencies like Foor Toms and Bass drums then add that with smaller mics that capture Toms and Snares loads. Then add a mic that can capture specialized sounds that cymbals and Hi-Hat make like a condenser microphone. This covers recording the entire drum kit.
Some Drum Microphone kits include a set of 3, 6, 7, or more mics in a case with the clips, goosenecks, and attachments you’ll need to mic each individual drum component and send that sound to a mixer. These pieces are everything you need to record your drums in a powerful isolated and separate way. You can hear the ring of the cymbals and the punch of the Snares along with the booms of the Kick drum and all independently.
Shure uses the SM 57’s for Snare work or Toms but also has a wide variety of word usage and can be used anywhere there is a sound source.
Shure Beta 52A with a built-in drum mount, serves as the kick drum mic with its good low-end handling.
When dealing with drum miking for recording or live sound, high sound pressure handling-SPL (over 160dB), is needed. A dynamic cardioid mic is designed specifically for use with loud instruments like snare and toms.
When deciding on what kit to buy make sure there is an advantage to buying a kit over individual mics. The price should be lower with the kit. You should be able to use the mics in other applications besides the drums. Many of these mics can be used for voice or other instruments. While close proximity mics are Dynamic microphones, Overhead recording mics that you will need are Condenser Microphones.
Dynamic microphones are ideally suited for Snares, Toms, and Bass or Kick Drums They are the go-to mic. The workhorse microphone.
In the studio, close-miking each drum component with dynamic mics gives you more control over each drum part, which is important in the production process.
Because Dynamic mics offer a better Mid-Range frequency response. They have a better sturdy built body for mishaps that will occasionally happen in drumming. They also have a pre-EQ to make each miked drum sound better.
Condenser Mics usually come in pairs and are normally used as overhead microphones that record air on top of the kit. Recording Cymbals room mics to capture the wide frequency range of the cymbals and ambiance of the room.
A great set of Drum Mics used by the Pros and found on Amazon recommended here is Audix Ste-8 Studio Microphone Package for Recording
Recording Drums on a Budget
Before the use of multi-track recording when making an album was done with minimal electronic reinforcement and processing tracks. It wasn’t possible for bands, never mind orchestras to have their own microphone for individual tracks.
Some of the greatest recordings were done with a few microphones and done on a few tracks. Bands like Led Zepplin with drummer John Bonham and Mitch Michell from Jimmie Hendrix’s band actually used one microphone in mono to record drums for some of the most important music from that time period.
Others like Coltrane and the Beatles did the same. The sound was limited to the space that the drums were in at that time and with a few hell of great Engineers and Producers that music ever came up with.
When the Levee Breaks by Led Zeppelin, Jon Bonham’s drums were recorded on two M160 double-ribbon microphones placed approximately halfway up a stairwell in the foyer of a huge empty house. The result was epic. The drums were saturated with effects that made the drums sound incredibly enormous.
The fact is you don’t need to over-mic your kit to make it sound great. There are certain scenarios where 2 or 3 mics might be all you need to get the song projected and the sound that you desire.
Here are some small simple Setups for miking your drum kit starting with one Microphone Recording. I just want to emphasize that Microphone Placement can be extremely effective. Based on what this series has been all about “Less is Best” Technique is everything. So use different positions until you find what you are chasing.
Drum Recording Techniques
In this example, we use one Ribbon Mic to record the drum kit. This is what’s being called a minimalist approach for miking drums. Or miking drums on a budget in a small room. This is where most Home Recording studios come in. You can use a Cardioid microphone that is less expensive. Get the microphone placement down. Check this video out on using 1 mic in a smaller room.
Recording Drums With One Mic
The AEA N8 Ribbon is a modern type ribbon mic that reproduces the classic Ribbon mic sound in recordings. They run over 1000 dollars so it kind of does away with the Budget but I included it because it was something new. It can be found here through our site at Amazon AEA R84 Figure-eight Large Ribbon Geometry Velocity Microphone
1 Overhead Mic Recording Set-Up using a Condenser Mic
1 Mic Recording Technique
The 1st position is 10 ft. out in front of your kit. The last position is directly Overhead of the drum kit centered over the kick drum batter head. Approx. 40 inches above the drums. The work should be done with a large Diaphram Condenser mic. The last placement allows the microphone to see the entire kit.
The larger your kit is the higher you extend the boom over the kit. You may need to lift the mic a little higher to hear all the drums. First, Move the mic stand out from 10ft to 5ft-to Overhead position. The closer to the kit the more tone and frequency will fill the mic. Experimentation is crucial because the acoustics of the room will have a huge bearing. So try a lot of different placement heights once the boom is centered over the kit.
Recording Drums With Two Mics
2 Microphones Recording Overhead Set-Up
*Microphone Placement for Kick Drum
This barebones example will be a Cardioid Condenser mic that will only hear sounds from the drums on-axis from below the mic. Use the 1 Overhead Mic Recording Set-Up then add another microphone, a Bass drum mic.
Adding a Ribbon Bass drum mic will allow you to hear the crack of the snare and the low end of the Bass drum together. The mic can be placed outside the breather hole of the kick drum. Move it in and out for the defined sound you’re looking for.
Ribbon mics are tight and focused and are preferred kick drum mics in studios. You can use a Condenser in both positions but these are models used by engineers who are giving the best advice on pairing 2 mics to get the best-recorded sound.
I have never used a Ribbon mic but they are becoming very popular these days. Before you add EQ or any sound reinforcement, position the mics to pick up the best sound only by mic placement and position.
Another method uses 2 mics for the Kick Drum:
The closer you can mic a Kick Drum the more attack will be focused on the recording. If you can mic the inside up tight to the batter head this will drive up middle frequencies making for a great “slap” sound combined with the “Woof” sound that normally dominates this area of the drums. Somewhere in the middle is an incredible sound.
If you use this mic placement from inside the shell of the Kick drum you will need another mic to pick up the lower frequencies that the outer head creates and you won’t hear. This gets complicated and expensive. To simplify it use this.
Here is a typical Simple 1 Mic Placement for Kick Drum I use:
- Slide the mic head through the breather hole up to them around 6 inches from the batter head.
- Point the mic on the inside of the shell off the center of the batter head.
- Pull the capsule out farther towards the front of the Bass where you will pick up the natural lower frequencies normally found here. The farther you pull the capsule out the more bass you will pick up. The more centered the mic is to the batter head the more “slap” you can pick up. Experiment with these positions.
- Keep the mic head out of the way of the wind caused by the beater in the breather hole. The wind blast will cause problems with the Phase of the mic.
Move the mics around before adding anything and you’ll be able to get some really good recording. Some songs don’t require a lot of beef on the drums or they might sound ok with a thinner sound with less low end. Mic placement can create all different scenarios.
You’ll start to notice that you are missing some presence from the snare and kick drum. This will lead us to the 3-mic Set-Up. Each time another microphone is added you need to check the Microphone Phase. Check this video out on what is Pase.
How To Check Phase
Checking the Phase is critical not only for the drums but with any instrument that is being miked by more than one microphone. Out-of-phase mics will suck the low end from a mix but it will be more difficult to fix later in the final mix. This is a common problem that can be lessened.
The chances of Phase Cancellation problems are far greater when miking drums because of the number of mics used. The mic will never be completely in Phase but the problem could be minimized by simply reversing polarity on some of the channels on the mixer. The only way of doing this is by listening. Here is a way to check for Phasing after recording some drum sounds.
- Listen to the overheads on your monitors that are pan hard left and right then listen to them panned center. Do they sound thin when panned to the center? Is there a more low end and depth when you flip the phase switch on one of them? Choose the position of the Phase switch that sounds the best, put them back into the stereo mode and move on to the next step.
- Try the Kick drum mic channel and add it to the mix. Switch the polarity for the kick drum mic on the console or DAW. Is there a more low end when you flip the Phase switch? Stay with the Phase Switch position that has the fullest sound.
- Then add the Snare drum sound to the mix. Switch the polarity on the Snare channel on the Console or DAW. Is there a more low end when you switch the Phase switch? Again stay with the position that has the fullest sound. Remember that you can’t eliminate Phasing completely but one position of the Phase Switch will always sound better than the other.
- Do this with each channel that is being used. Stay with the position that has the fullest sound.
Drum Recording Setup
The 3 Microphone Recording Set-Up
Add 1 & 2 Microphone Recording Set-Up with an added Condenser Cardioid mic set up overhead approx. 40 inches high. The Condenser mics are set up roughly in the vicinity of the cymbals, over the Toms, and equal distance from the center of the Snare. When you pan you should hear the Toms move left to right.
The 4 Microphone Recording Set-Up
*Mic Placement for Snare Drum
This is the 3-mic Set-Up with a Snare mic added. The punch of the snare is accented and separated from the overall sound of the other drums. the pro’s use of multiple mics for each drum. You do not need 2 mics to record excellent sound from each drum. It’s all about Location and Placement.
Capturing the snare sound is one of the most critical aspects of drum recording. On the stage and in the studio the snare is usually miked using 2 microphones. One above and one below. The majority of sound comes from the top. The top of the Snare is generally a Hyper-Cardioid mic with the bottom using a Condenser that can handle high SPL or another Dynamic that should carry the work-load and keep SPLs from being a factor.
You don’t need the Pro’s version for a great sound. I would recommend 1 Shure SM57 and mic for the top only. Here is the Placement for miking a Snare Drum:
- Try 3 inches off the head on the edge-pointing towards the center.
- The Snare mic position is usually set up between the Hi-Hat and the first Rack-Tom this will minimizes bleed while keeping it out of the player’s way.
- Positioning the mic closer to the snare head will also minimize bleed captured from the rest of the kit. This has a drawback, in that the closer the snare mic is to the head the darker lower end frequencies will become exaggerated.
- Angling the mic down- towards the edge will emphasize the overtones-while angling the mic towards the center of the head will emphasize the attack. Start here and experiment.
- For a dryer snare sound with less ring move the microphone capsule outside of the rim.
- The bottom mic can be placed directly under the snares. Place the mic close enough to minimize bleeding but not too close so that the snare makes contact with the mic. Adding a bottom mic can add some snap and crispness but also can complicate things. The option is yours.
- Condenser microphones can be used if the genre of music is called for quieter music like Jazz, Where the SPLs will be lower. In the case where brushes are used on the snare playing.
after you and the fellows started getting gigs and making bucks…….
The 5 or More Microphone Recording Set-Up
*Mic Placement for Toms
Although the toms on your drum kit are the least used drums on a kit they could be the hardest drums to the mic. Either a Condenser or Dynamic Microphone can be used for Live play or Recording. A Condenser mic will offer an open-high fi sound.
A Dynamic microphone will record with more punch and a tighter pickup pattern. They will both do the job.
Experiment with mic placement and position. Try and keep the Crash and Ride Cymbals from the proximity of the microphone.
- Aim at the center of the head- 3″ up roughly at a 45-degree angle.
- As I mentioned earlier the closer the Dynamic mic is placed on the drum, in this case, the Tom, the lower the frequency is recorded while reducing bleed from the rest of the kit.
- Moving the Dynamic back from the drum head will open up the sound of the Tom drum being recorded.
- Aiming or tilting the mic towards the center will create more attack while a straight up and down placement will emphasize the overtones.
- Use these positioning techniques to adjust for the type of mic you are using whether Condenser or Dynamic and the sound and style you want to hear from the microphone performance.
- Place the mics for the Toms as far off the axis of the cymbals as possible to mitigate cymbal noise that will bleed through. Especially from the Ride Cymbal. Aiming the mic away from the snare will also help eliminate extra noise.
Many Studio Engineers agree that the most important part of miking drums and mic placement is the players themselves. Hitting on consistent spots and consistent fashion all are important factors for recording drum Techniques. They all recommend clip-on mics like Apex and Audix mic lines that are quality recording equipment and lots of bang for your buck.
Always check the prices on the assorted mics used for drum recording. They do the job and handle the problems that come with SPL and placement around your drum kit. Pro studios mic top and bottom of Toms like the Snare but you don’t need to do that. You can get excellent sound with minimal mics and good placement.
*Mic placement for a Hi-Hat
The Hi-Hat is an important component in the drum kit and should be overlooked when recording. A small diaphragm Condenser can get the appropriate sound. A bright detailed sound is needed to separate the High-Hat from the other drum parts. No matter what type of mic you use make sure that the diaphragm is pointed at the sound source on the hat. Here are some suggestions for mic placement:
- Make sure the mic is high enough when the hat opens
- If the mic has a low-frequency roll-off you can get a closer placement further reducing bleed from the rest of the kit.
- For a higher, more controlled sound move the mic closer to the bell.
- Some drummers mic the edge of the hats Parallel to the cymbals to catch the air that is expelled from closing the hi-hat. This is not such a good idea and can even damage the mic and ruin the recording.
- Some sounds to look for on hi-hats are the crispness and brightness attributes that compare to the lower frequencies of the fat drums underneath. Also, find that position that will pick up some of the player’s stick sound that is mixed with it.
*Room Mics For Live Recording
The last miking technique is using a Room Microphone. Room Mics add depth and excitement to the recording of the drum kit added to the other mic Place Techniques can have a full professional sound that is thick and full of ambiance that is found in big rooms.
Room mics can be a set of stereo mics that are placed at a high level across from your drum kit on the other side of the room. They can also be situated down lower in front of your kit 3 foot or so off the ground. There are no rules when using Room mics for drum kits.
The idea is to pick up reflective sounds that could be coming off any surface from any corner of the room. Again it’s about experimenting. Here are a few examples:
- Use a set of stereo mics at high levels than low levels across the room pointed at the Drum kit.
- Point the mics away from the drum kit toward corners or any other reflective surfaces in the room.
- Use sound barriers between the mics and the drums. Blocking off the direct sound will actually make the room sound very large in the recording.
Microphone Placement is critical in controlling sound delivered to microphones in any size room or on any type of instrument. These techniques can change your sounds completely and with a slight adjustment will change them again.
You can get the sound you are looking for with a few microphones and some experimenting with positions. These Placement techniques are just meant to be a starting point.
JimGalloway Author/Editor
MikingDesign.com
