
The Best techniques for microphone placement when recording any instrument are all based on the same things. The Acoustic Guitar is no different. What recording factors determine Acoustic Guitar Mic Placement?
- The Player’s Ability & Consistency
- The Instrument or Sound Source being properly Tuned & Working
- The Room should be picked for the best-sounding Ambiance & Natural Reverb
- Start with 1 Mic
- Pick the best Miking technique
- Distance & Direction of the Mic Position obtaining the best Tonal and EQ Quality
Using a starting point or a standard when recording will give you a place to go and make the changes necessary for making your recording the best you can with the limited amount of budget and equipment you are using.
Acoustic Guitar Recording Techniques
The Player will have to be consistent enough and play well enough so that the choices you make on the microphone placement will give you a better sound. You don’t need to be an expert just consistent enough so you can make a comparison. If the player is ready then you can get the parts done without hiring a professional guitar player which will cost you. Know your part before you start.
The Instrument or Sound Source needs to be in decent shape and in tune for the same reason you need to start at the beginning so you can make an educated decision at the end of the experiment you are creating. If your guitar is out of tune or it can’t stay in tune, the comparisons you are trying to make between mic positions and placements won’t really matter.
The Room has to be taken into consideration. Bad acoustics will affect the tones and frequencies that you need to hear to get a judgment on the quality and the differences that will separate or isolate the sound you are looking for. Miking the Acoustic guitar will be no different than miking any other instrument.
Keep it simple. Change your strings keep the room fairly acoustically sound and keep the music style in your capability. Consistency and simplicity are key. If you see how Studio Engineers make changes, they are slow and methodical. You can capture huge differences in recording sounds just by an increment of 1/4 inch one way or the other.
Distance & Direction in recording Acoustic guitar, rather than moving the microphone to the sound source you may want to keep the mic stationary and move towards the mic as a vocalist will do. Turning your body into and out of the mic area will EQ and set volume before touching any of the electronics.
Angling your body using the sweet spot of the mic, the soundhole, and the frets on the guitar neck that you can count from the opposite direction, while listening will get you to the proper placement.
The proper placement is the one position you decide that is the sound that you are looking for.
The Technique Using different techniques for a variety of sounds can spice up and add dimensions to a recording. Start with the basic variables whether you’re using a One Mic Technique or an X/Y Stereo Technique, always start with the same placement basics, then make the changes.
This is how most studios do it. This is for the sake of consistency and to keep things absolutely the same so that small changes can be noted and documented.
I always use a starting point and worked from there. This is because all guitars and all the rooms are different. You probably are working in the Home Studio alone setting up the DAW and working on the guitar and microphone. So it will also be easier than adjusting the mic 50 times until you find the right sound that you have been chasing.
In a simple technique Somewhere between the soundhole and the neck is the sound you will use for the best balance of lows and highs, darks and bright. The sound you are looking for is up to you.
Factors Recording Acoustic Guitar
Creativity much like a Piano can deliver an entire message and feel for a Songwriter. The basic one-mic one-guitar can absolutely define and capture the sound and moment that will lead to a completely original song. This technique is based on the correct positions that will only capture the acoustic guitar using one microphone. We are taking for granted that the room we are recording in has the necessary elements for the right acoustics.
- The Room– If you don’t have a studio, that is fine. Find the part of your home that has the best-sounding ambiance that will add another level to the acoustic guitar. You know which room sounds the best when you play your guitar. Use that one. It’s not necessary to hide in the closet but try to keep the reflections from hard surfaces down and even cover some up. You are not trying to soundproof the room.
You are just trying to absorb some of the reflection to isolate it. Some hard surfaces might even make the room’s ambiance sound better, making the room sound bigger as with natural reverb. Experiment. Couches Beds and furniture can absorb more sound and make the guitar sound dry. This is the EQ control you have before touching any electronics. So add a little and take something away for leveling the Room’s EQ.
- Inspect the Guitar- Everything starts here with your guitar or the sound source. Re-stringing your guitar will bring the brilliance and tonal effects that only an acoustic guitar can bring. The bright highs and subtle low ends can develop but won’t come out if the strings aren’t new. Everyone has their own favorite they use for various reasons because everyone’s ears are different. My strings are Martin Marquis Medium gauge. To me, they are the finest on any acoustic guitar. I’ve used them on my Gibson Gospel, Taylor, or my Martin and they all seem to sound better than any other strings.
You could favor other strings but the important thing is that the strings are new. Then tune up perfectly. I’ve laid down some really good tracks and then tried to layer the guitar with another one on a different track and found that the first one was slightly out of tune. This ruined the first track and I had to start again. Start with your guitar re-stringed and tune-up.
No matter how cheap your guitar is, it will always sound better with new strings on it. Consider buying a tuner that clips on the guitar and lights up with a big display that is easy to see recording or on stage playing live.
- The Player– The only thing I can add to this element is that if have come this far and are serious about putting your music down for others to listen to and critique. Section of what you are going to play and rehearse it until you know it like the back of your hand. It will make the recording process a lot easier if you are sure of what it should sound like before it is recorded.
Recording Acoustic Guitar
Use the Right Microphone- I use a Perception AKG P-170 Small Diaphragm Condenser Microphone for miking my Acoustic guitar. This Cardioid dual-purpose mic is a reliable microphone for recording drums, and voice, and is perfect for recording Acoustic Guitars.
The Perception AKG P-170 microphone has a high SPL and a good wide frequency range and is great for musicians with a Home Recording studio. No matter what Condenser mic you use, make sure you line the mic’s front sweet spot up correctly with the sound source. Another good one for the value is AKG C1000S High-Performance Small Diaphragm Condenser Microphone
The Perception has an easily marked logo on the front of the capsule is where you start. Condenser mics are much better for acoustic guitar recording than Dynamic models. The Condenser mic is powered by Phantom Power, switch means it needs juice to operate that normally comes from the mixer or pre-amp. It is easy to move around and good quality Condensers are inexpensive.
In these techniques, you can use a Large Diaphragm or a Small Diaphragm Condenser mic which is a matter of choice and budget. Most of these mics all work well and depend mostly on placement and technique for the best overall recording.
The 1 Mic Placement Technique in Mono for Recording Acoustic Guitar
- The mic is pointed to the Neck/Body Joint from a distance of 8 to 12 inches out. You’ll find a much more balanced sound from pointing the mic at the soundboard around the 12th fret. The 12th fret is the mic position most used in recording Acoustic Guitars in studios today. Turning the mic off-axis towards the player’s pic hand. This placement accentuates Clarity and Detail.
- This Large Diaphragm Mic is pointed towards the Soundhole for a fuller body end. The mic is angled slightly off-axis to avoid too much boom. Most of the better lower frequencies come off the Soundboard of the guitar. Unfortunately, this is the worse place to try and mic the guitar. Because of the air blast and boominess that come from this part of the guitar, somewhere angled off the side or the bottom and the top can be miked at a distance.
- If the Mic is pointed towards the guitar’s bridge, that will accent the smoother mid-range frequencies from the Acoustic Guitar. This area where the guitar’s tones are not too bright and not too bassy will work better in the mix too. The Acoustic guitar won’t overpower the rest of the instruments or voice and stay in the back but with some presence that you can still get.
- Micing up the guitar neck will pick up mid-range tones and frequencies. The farther down the neck the higher the frequencies and tones you can pick up. These tones are natural and very important to the acoustics of the guitar which makes using 2 mics even more logical from a recording standpoint.
Spaced Pair A/B or (2) Mic Placement for Recording Acoustic Guitar
This technique will use 2 Small or Large Condenser Mics that are spaced apart 1 to 2 1/5 feet apart. The mics could be the Small Diaphragm Pencil Condenser types that are the ones I use or the bigger Diaphragms. Because of their size, I prefer Pencil type mics. they are perfect for this type of set-up. They seem to stay out of the way and are economical in the world of high price recording microphones.
Also, Sound Engineers will admit that some Small Diaphragm mics will actually produce a more natural replication of the Acoustic guitar than the bigger guys do. They have some limitations but all in all, really sound good.
The Large Diaphragm adds flavor and color and makes the sound appear bigger which can be a great thing in most mixes. Not always, it depends on you. Your ear and your pocketbook.
One popular Place Technique is the first mic pointed at the 8th fret and the other is pointed at the 12th fret as in the earlier placement one mic method.
You may have to adjust the small diaphragm types of mics a little closer to the source because they won’t pick up lower frequencies like some of the Large Diaphragms do at a closer range.
They need to be a little closer than the 12-inch distance placement otherwise the sound will be thin. I have used this placement at around 5-8 inches and they record hammer-ons- pull-offs and fingerpicking style very nicely but they can also muddy up if they’re miked too close.
Another placement is to point the mic between the bridge and the player’s right hand taking away from any finger noise that may come from picking strings. The emphasis is placed on mid-range frequencies. This position is good for recording slide guitars.
If you move one mic out onto the body, the soundboard. This placement will soften the sound and take away some attacks. You can pan one mic hard left and the other panned hard right. You can use the same position for strumming just check the distance. You can mic the guitar player from over the shoulder to get the perception that you are playing and hearing the guitar at the same time.
Some Sound Engineers will move one Large Diaphragm up above the guitar to get closer to the soundhole by placing the mic above the guitar at the edge and pointing it down above the soundhole or the player’s hand. This will avoid the blast from the front but add more low end to the mix. Then you can adjust the lower-end frequencies by moving the mic in and out closer to the source of the sound.
Most mics Condenser or Dynamic used in the studios are Cardioid directional meaning they pick up sound directly in front in the direction they are pointing to. The closer they get, two things will happen one, you will get more bass and two you will get more direct sound. This is because the mic will pick up less room space or reverb ambiance.
XY Stereo Technique Mic Placement
The XY Technique or sometimes called a Coincident pattern is a stereo option used in all kinds of applications. For this technique, you need two mono mics stationary at 90-degree angles with the capsules as close together as possible without touching each other. Most handheld digital recorders are built with this pattern. The angle made by the 2 mics is then pointed to the sound source.
Check the phases for these mics. The distance between the two mics and the sound source is the main variable that you work with. Sometimes there is a trade-off between the closer advantage you get with this technique and the frequencies it picks up and the cleanliness and clarity that comes from being a little farther away while recording. Wearing headphones will give you the best definitive differences and results.
- The 2 mono mics are aimed at the 12th fret of the guitar or where the neck meets the body.
- Starting 18-24 inches distance off the source
- Move into about 12 inches off the source or the guitar.
- Back out and then in close to around 10 to 12 inches to search for the best overall sound. The Sweet Spot
- Separating the microphone angles slightly with the result being more space from the room and less guitar possibly lowering the low-end frequencies. Or one mic can give you higher brighter frequencies coming from the neck area and the other mic pointed towards the soundhole picking up lower bass frequencies. Experiment a little. Moving the mics back off the guitar and adding space and distance, while listening to making these subtle changes will help EQ the sound and narrow down the results you desire.
M/S Mid Side Stereo Mic Technique
The main weakness of the XY microphone technique is the fact that you’re stuck with what you’ve recorded — as well as its stereo image. And in some cases, collapsing those tracks to mono can result in some phase cancellation. The M/S or Mid Side mic technique gives you more control over the width of the stereo spread than other microphone recording techniques and allows you to make adjustments at any time after the recording is finished.
While XY recording requires a matched pair of microphones to create a consistent image, M/S recording often uses two completely different mics or uses similar microphones set to different pickup patterns.
Stereo recordings are usually done using 2 mics recorded on separate tracks and panned left or right. This technique has the mic pointed directly to the source while another mic captures the left and right or the sides. It works like this:
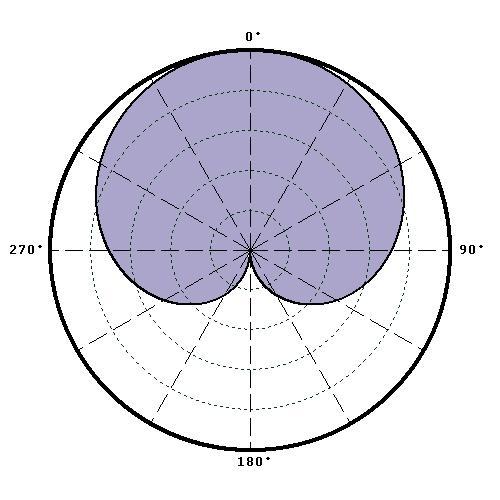
- Set up a Mid mic and a Side mic. The Mid mic is pointed at the source which is the Acoustic Guitar at or near the 12th fret. This mic is recorded as you would any Mono mic. The mic should have a Cardioid pick-up pattern that will pick up sound from the front of the mic and rejects sound from the sides and the rear.
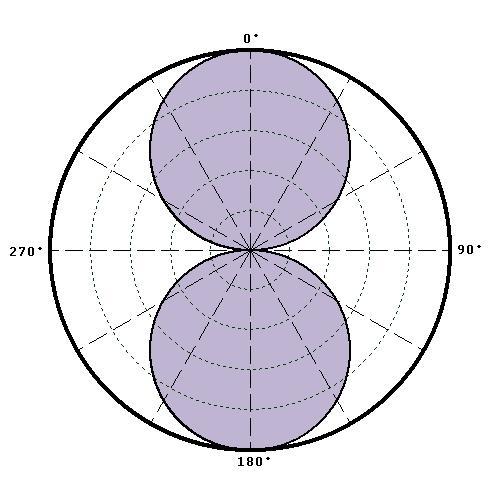
The Side Mic is turned 90 degrees from your source, perpendicular to your guitar, and listening to the left and right sides. This Side mic has a Figure 8 polar pattern so when turned sideways it will pick up the sound from the front and the back of the microphone.

- Record your 2 tracks-Mid and Side Tracks
- Duplicate your SideTrack. Now you have 3 tracks.
- Switch the Polarity on the Sidetracks until the original and duplicate track cancels or phase themselves out.
- Pan the 2 Side Tracks Hard Left & Hard Right- Now you can hear them!
- Set your levels for your 1st track-The Mid Track
- Blend in the levels of the 2 Sidetracks. This creates a big Stereo sound. The more level you add the bigger sound you get. Blend in more according to taste.
Recording Acoustic Guitar and Vocals with One Mic
There are specific tendencies for Singer-songwriters to be able to sing while they play, making them more dynamic and versatile. It makes sense to record them that way to show the natural way they exhibit their talent. Separating the vocals from the guitar playing can produce mistakes. You can still, and lots of artists do separate vocals and guitar or piano. There is a kind of magic when you go for it and do both at the same time.
In a Home Recording Studio miking an Acoustic Guitar with the voice can be time-saving and produce better quality tracks. You also can make some mistakes on the guitar or vocals and might have to live with it.
I’ve tried both ways and found you need to make sacrifices. Sacrifices are chances and some chances are worth taking.
In recording the idea is to isolate instruments including voice as much as possible. This is so that the 2 don’t bleed together. So playing and singing go against that concept. There are a few techniques that are used to be able to perform this as well as possible.
The idea is to bring the mic for your vocal and the guitar closer for a more intimate recording. The tracks will still bleed through but the recording will be natural and have a live feel that Singer-Songwriters need to exhibit and deliver and most importantly capture that moment of their special art form that is powerful and intimate. Here’s how.
- Set up a Large Diaphragm Cardioid Vocal microphone first in a way that sounds the best frequencies but at the same time Rejects the guitar mic and its frequencies. This is the Position:
- Have the mic turned upside-down below the singer’s chin and facing up towards his/her mouth. This is to keep any sound from the Acoustic Guitar from being picked up.
- Position the Guitar mic in a normal placement but closer and tilted it Down towards the singer. This will keep the majority of sound from being picked up by the vocals. When you go to mix the two and blend them together there should be some isolation between the vocals and the guitar. There will always be some bleed but you can accomplish isolation with good microphone placement and knowing where that sweet spot is on the mic direction.
- As always whenever you use two mics together there could be a phase issue with them. The sound will reach the two mics at different times which creates a cancellation effect. Once you record something tests the phase by playing it the recorded piece back and flipping the phase on one of the mics on the preamp or in the software you are using. The polarity or phase switch will look like a zero with a line running through it. If you flip it and it sounds thin with no bottom end the mics are probably in a good position. Flip it back to that position. If you flip it and its sounds a whole lot better then leave it flipped. The sound should be big warm and full.
- Always use mic placement that when set up to a position is a little forgiving meaning that if you move a certain way or a little out of range there will be some play with the placement between the guitar and the mics and the vocal and the mics.
Miking a Singer-Songwriter or a live player should not have sacrificed the genuine intimacy and power that comes from their performance. In most Home Recording Studios, you are doing the writing, miking, and playing yourself. These placement techniques I wrote here about are made for people like myself and you who are not in a professional studio setting.
They can be done with inexpensive equipment and set up by yourself. So try and keep it simple and don’t expect professionally produced sound. Home Recording Studios are operated by Songwriters who need to get that song out of their heads and on the Internet. These mic placements and techniques will help you do that.
JimGalloway Author/Editor