With Woodwind instruments microphone positioning is everything and where you think would naturally be the best placement or position for capturing their colorful frequency, may not be at all. What are some of the Best Mic Placements for Recording Woodwind Instruments?
Flute
Aim Large Diaphragm Condenser Mic at your nose approx. 1-2 ” above your mouth & 6-8″ out
Clarinet
X/Y Stereo Technique 10 “out or
Aimed towards the Bell 24″ Out & 48″ Off the floor
Oboe
3-4 ft away-aimed at the center of Oboe Body
Bassoon
Use an Omni Directional &
Small Diaphragm Condenser 3-4 ft out
The main idea for recording or playing live with any instrument especially in the case of Woodwind Instruments is to capture the natural fullness and complexities of their sound without the noise that keys or moving parts play such a huge part of on these instruments.
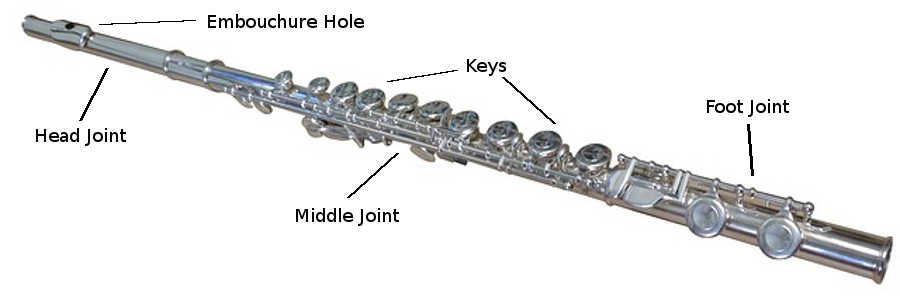
Miking a Flute
Most of the sound that a Flute comes from around the mouth at the Embouchure. It is basically the same thing as blowing across the top of an open bottle. The best position for the microphone is going to be at this location. The problem with this position is that it’s also the spot where a mic will pick-up a large amount of air from the player.
To eliminate this problem you can slightly change up the position.
By now if you have been reading this blog you should be aware of a technical problem that Close miking can cause called Proximity Effect. With a Flute, this is a typical problem because of the natural position of playing up close on the microphone. There is a lot of breathing and mouth noises associated with playing and recording a Flute. This will affect the quality no matter how good you can play.
According to Neumann Microphones- Proximity Affect
The proximity effect is a phenomenon that leads to an increase in low frequency response as you move the mic closer to the source. The closer you get, the bigger the bass boost. This can create problems, but at the same time it opens up ways to shape the sound.
If controlled the Proximity Affect can have some advantages making the sound of the Mic richer or fatter adding some lower frequencies The placement needs to be checked for a good overall balance and maximum transparency. Low-frequency content suffers from this below 200 Hz.
The effect is very noticeable in the lower frequency when recording. The proximity effect is often an issue when you record guitars (the E-string is around 80 Hz). Acoustic guitars, in particular, often can sound boomy when you place your mic too close.
But for dedicated bass instruments such as kick drum, bass guitar, or upright bass, the proximity effect can be helpful to create and even add some big fat bottom end. With these instruments, you won’t be using higher-end frequencies. So there is better control.
The Flute has a wider frequency range so it is more difficult to control than other Bass instruments. There are some techniques used to deal with these problems when recording in your Studio.
Flute Technique #1 Mic Recording
- Small Diaphragm Cardioid Condenser Microphones 1-3 feet away. Aim the Mic a little higher more towards the tip of your nose only an inch or two. This will clean up the noises like lip-smacking, clicks and pops just by blowing a little lower than the microphone is pointing to.
Say approximately 6 or 8 ” out or away. For more room ambiance - Small Diaprahm 14 ” away pointing at the player’s left hand pointing towards the Middle Joint of the Flute will add some lower frequency for richer silky sound to your recording
Flute Technique #2 for Recording
- Aim the Mic a little higher at the Blowhole or Embouchure of the Flute, more towards the tip of your nose only an inch or two higher. This will clean up the noises like lip-smacking, clicks and pops just by blowing a little lower than the mic.
- 6 or 8 ” out or away from the Mic.
- Use an Auxilary Mic along with the main Mic-4 ft. away aimed towards the back of the Flute
- Mix the two together
- Use Vocal Microphones High-end Large Diaphram Condenser Microphone
How to Mic a Clarinet
Miking a Clarinet is somewhat similar to the miking of a Sax. The tonal sounds will source from the body of the instrument itself, not the bell. So the best position is coming through the body and to mix with the room’s sound. You need to experiment with that in mind.
The clarinet is one of the most commonly played and taught woodwind instruments. Clarinets appeal broadly to students and can be played in a variety of school band and orchestra settings. With its characteristic dark, earthy tones and a broad range of notes, the clarinet can be a wonderful lifelong instrument choice.
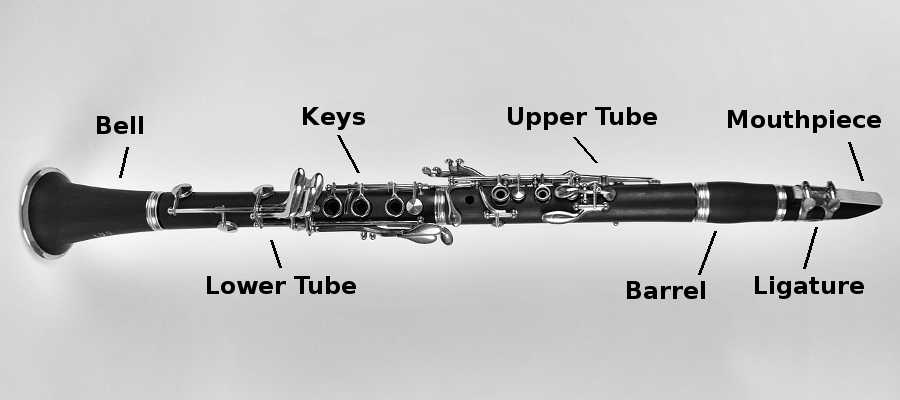
The Clarinet uses a single Reed that will vibrate against the Mouthpiece when the player of the instrument blows that will excite the column of air inside. Just like the Sax miking the Bell won’t be a good spot to mic the Clarinet for the same reason that the instrument produces quality frequencies through the holes along the length of its body.
Clarinet 2 Mic Technique: For Recording
X/Y Stereo Technique:
- Using small Diaphram Condenser Microphones
- One Mic pointed towards the Bell & Lower Tube Side
- One Mic pointed towards the Upper Tube Side
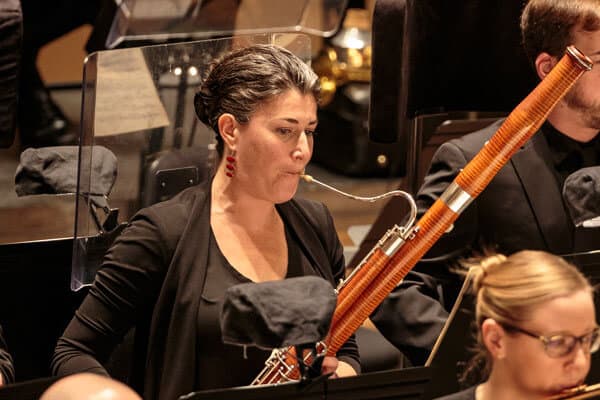
Miking a Bassoon
The odd shape of the Bassoon with large body and upward turned Bell make the miking o this instrument somewhat difficult. The bassoon is a woodwind instrument in the double reed family that plays music written in the bass and tenor clefs, and occasionally the treble.
You’ll see Bassoons in orchestras, concert band, and chamber music literature. If you have one and want to record it or play it try some of these Mic Placement Techniques.
Bassoon 1 Microphone Technique For Recording
- Using a Large Diaphragm Cardioid Condenser Microphone
- 24 Inches Out & 48 Inches off the floor
Miking an Oboe:
Oboe 2 Mic Technique: For Recording
- An Oboe is miked from a distance of 3-4 feet away taking advantage of the space in the Studio. That’s because the sound doesn’t come from the Bell and is mostly coming from the body of the instrument.
- Use a Large Diaphragm Cardioid Pattern for Close Miking
- Use a Smaller Diaphragm Omni-directional Mic for picking up some room space recording. For a larger feel and sound.
- There are a lot of keys that can make clicking and clacking noises along the body so it’s not desirable to Close Mic this instrument.
- The modern oboe is a complex instrument. An oboe built according to, to specs also called full conservatory, has 45 keys that could make some noise in a setting of any type of Home Studio.

Any kind of Horn player in the Studio to record their music should look for a large-diaphragm condenser microphone or a ribbon microphone. Both work equally well and are the best for this application.
Ribbon Microphone vs Condenser
These mics usually have a 1″ diameter or larger mic capsule that helps provide a large round sound with a bigger low end, a boost in presence at 2-4k, and a clear top end.
Most Large-diaphragm microphones like this one called Neumann TLM-102 Large Diaphragm Studio Condenser Microphone (Nickel) with Suspension Shockmount & Pop Filter for a little more dough you can capture both sides of the frequencies that are used for recording vocalists, but these characteristics are also great for horns and Woodwinds as long as the boost in presence is not too overly-exaggerated.
When deciding on a microphone to record Horns or any wind instruments, you need a microphone that has a big, full open sound. You’ll want one that captures the complicated tonal characters and the subtle details of your sound.
And be sure to listen to the transients of each note the front end of the sound and be sure the mic has a fast enough response to capture everything your instrument puts out. Ribbon mics like MXL R77 Classic Ribbon Microphone with Mogami XLR Cable Desktop Mic Stand and USM-001-G Shockmountare a little darker sounding than a Large Diaphragm Condenser but too bright isn’t good either.
Ribbon Mics will perform even better Some are quite expensive but that won’t make it sound better necessarily so experiment some. Without getting too deep with technical information I have heard plenty of Sound Engineers say that in certain situations Ribbon Mics are best for recording Horns like Saxes and Woodwinds like Clarinets and Flutes that tend to sound bright.
You can spend $20,000 dollars on a Studio Mic and it won’t make your original tunes Hit Songs. A 300 dollar Microphone can’t do it either. They are both tools that can make you sound professional if you use them the right way.
JimGalloway Editor/Author

References: How the Right Microphone Can Make Horn Players Sound Even Better
