
When working with a small group of voices that need to be distinguished from each other positioning and Placement of microphones is more essential than ever. What is the best way to Mic a Choir?
The Best Way to Mic a Choir is to:
- Use Cardioid Condenser Microphones
- Using 1 Mic-aim the mic at the tallest singer’s mouth in the last row or 2-3 ft. above his mouth.
- 2 or more Mics
- Use the A/B Stereo Technique with the 3:1 Placement Rule
- All Techniques 2-3 ft. Distance from the front row
Each person’s voice is different sonically and needs to be blended by basic techniques that are proven by professionals who say that the right microphone placement with the right Mic will capture what you need.
Choosing The Right Microphone to Mic a Small Choir
A Condenser Microphone can pick up sounds from sources that are farther away, unlike the Dynamic Mic that sound better at closer ranges. The Condensers are better at picking up larger groups rather than a lead singer in close proximity. The High sensitivity that the Condenser Mics have is better for distance miking. A recommended Mic to use when miking or recording a Choir is the Audix M1255B Condenser Choir Microphone (White) found here on Amazon
They are better at Pattern Controls to be able to pick up larger sounds and leave other sources out. But the overall achievement is to be able to position a Condenser Microphone that creates a good balance of all the voices, has a high gain before feedback, and produces a natural sound that is blended well.
What is surprising is that you won’t need a bunch of Mics or a few microphones. Fewer microphones mean less feedback and an easier job of adjusting for the best sound. The Fewer Microphones you use the better.
A decent cardioid choir mic, correctly placed, will cover 15-20 singers, arranged in a rectangular or wedge-shaped section about 10 ft. wide and 3 rows deep. A choir of 30-45 voices should require no more than two or three mics.
A/B Stereo Mic Technique
The Best Microphone Placement for a Live Small Choir
A small Choir consists of no more than 25 voices or fewer and can be easily covered by a Stereo Mic or 2 microphones positioned correctly. The advantage of these stereo mics is that they offer simplicity in setup and great mono compatibility.
They also tend to hear the blend exactly as the conductor hears it. The A/B method can produce a wider or narrower sound by their position using more than 1 Mic. The A/B stereo mic technique involves spacing a pair of cardioid or omnidirectional microphones apart in such a way that they cover the space but don’t create phase issues for each other.
Some Sound Engineers will use the tallest vocalist in the back row and align the mics at their mouth as a starting point while others say to add another 2-3- feet higher above that point so the front row doesn’t overwhelm the back row singers. So the placement can be pretty high.
Most professionals agree that 2 to 3 feet from the front row get a good mix and a well-balanced sound. Less is always best. If you need another mic or two then use the 3:1 Technique. But the Cardioid Polar Pattern is the Polar Pattern mostly used when miking a Choir.
Phase Issues
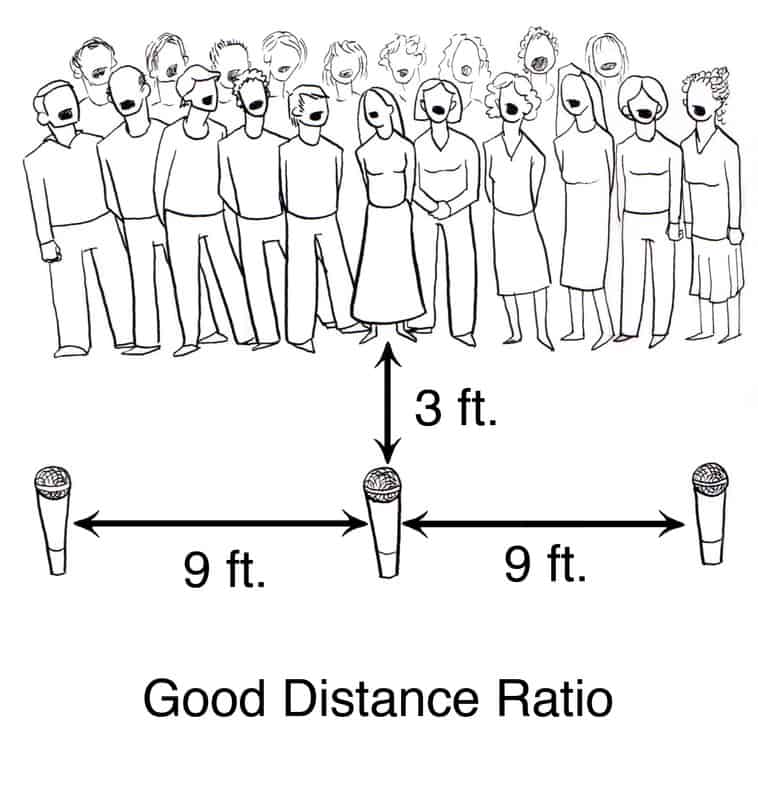
If a microphone is 3 feet in front of the front row of your choir or any sound source, the next nearest microphone should be placed about 9 feet apart in separation. In smaller venues with smaller Choirs, this separation of microphones works out well. The A/B Stereo Technique that was just mentioned is used with the 3:1 Rule.
These are basic positions that you can eyeball visually first then adjust the placements as you go along. Again you are working with a smaller type of Choir. This 3:1 rule might not work or be the best option for you to use maybe the room isn’t big enough or there are other factors involved.
The rule just means that you want the Mics far enough apart that they work independently of each other without any interference from each other.
Any other position other than this 3:1 separation will cause phase cancellation or the comb filter effect. This may happen when too-close mics pick up two vocal signals the same time in the mix, one direct and one delayed. Certain frequencies in the Mix will cancel themselves out.
Microphone Placement Tips for Miking a Choir
Miking the Choir according to Soprano, Alto, Tenor, and Bass is another Technique that is used by professionals to separate rather than blend the sound source. Although this way you are working more with the Director and people in the Choir more than you normally would. It’s more complicated but it might produce a better sound. There will be more Microphones that you will have to set up.
The advantage of this type of Miking Placement and the Technique that you use will also sound pretty good in a recording studio setup. So you might want to record the Choir Live play as a 2 Track Recording with the same PA and the same Microphone and the Placement Technique.
Using the Room for Ambiance and Reflection can add a lot of sounds that are beneficial when recording the Live Choir in the same environment.
Some of the gear used when capturing a Live Sound of a Choir are the lightweight small Condenser capsules used in conjunction with carbon-fiber Mic Booms that can extend up as much as 80″ and are easily pointed down on top of the Choir to aim exactly where you need to in order to capture the event. These Fiber Booms raise up to 84 ” are available at Amazon through MikingDesign 2 x Audix MicroBoom MB8455 Small-diaphragm Mini Cardioid Condenser Microphone with 84″ Carbon Fiber Boom Arm
Or this Choir Set-Up that is recommended by MikingDesign .com has the right kind of Microphone and the right kind of Polar Patterns for the job. Astatic 1700VP Mini Condenser Boom Choir Mic with Variable Polar Pattern – Equitek Studio Capsule for Extended Frequency Respons
Don’t forget, If you want to achieve a wider stereo image, you can move the two mics apart and use the A/B method with two-spaced mics. The mics can be spaced from 2–8 feet apart, depending on the size of the choir. With this technique, the mics will be positioned so that the left mic picks up the left side of the choir and the right mic picks up the right side of the choir.
Adjust the mic positions so that the overlap in the mic patterns evenly covers the center of the choir where there might be empty spots not being miked. Using every bit of the Polar Pattern available from the Mic.
Remember Most sound engineers choose to place microphones slightly above the choir and aimed down towards the horizontal center row. This will really depend on how large the choir is and the way they are physically positioned on stage.
What is a Boundary Microphone
JimGalloway Author/Editor

References:
Ear Training For Sound Engineers
